If you’re a student at a U.S. college, you probably have to turn in written work formatted according to the guidelines of the Modern Language Association (MLA). With Ulysses, you can easily create a document that meets your professor’s expectations. Here’s how.
Style sheets are what give Ulysses its versatility; they allow us to use the app’s inline commands to export for both digital and print media. Being able to customize them, particularly if you need to print according to certain standards, is a critical part of making Ulysses function as a home for all of your writing projects.
If you’re working on a Mac, you can download and edit style sheets, and Ulysses will automatically sync them with your iOS devices. Potentially, Ulysses can distribute texts to all your publishing destinations and your mobile devices, all from within a personal organization system that preserves and organizes the original draft.
So, how do you make style sheets start to work for you?
We can start by practicing some basic customization techniques using a simple style with a clear-cut goal in mind: a college paper set to MLA formatting standards.
If you are a college student working on a deadline, you need confidence that your work in Ulysses will translate efficiently into the proper format to meet your professor’s expectations. For many of us, that means Modern Language Association formatting for much of the work you turn in. While the customization techniques in this article apply to Ulysses style sheets in general, the focus here is to help you get from draft to print efficiently and in style.
Getting Started
Inside the Ulysses style library, there are at least three styles for academic papers. We’re going to work with the Papers style, because it uses MLA standard margins and already has the font set to Times New Roman, the favorite font of most college classrooms.
To get started, you’ll need to open TextEdit inside your Mac and disable “smart dashes”. Other CSS editors such as TextMate and Sublime Text (if you like colored highlighting) also work well. — To begin, open the Preferences from the Ulysses menu and highlight the Styles tab on the far right.
- Right-click on the Papers style and select Duplicate.
- Then, right-click on the duplicate (marked “copy”) and select the “Edit in” option.
- A dropdown menu will appear. Select an editor from the dropdown menu, and the style sheet will open automatically in the editor.
Now, inside the editor window, you’re looking at the code that formats your paper in the Papers style. Notice that the margins are set to 1-inch, and that the font is set to Times New Roman, all wonderful things for writing a standard MLA paper.
A good place to begin customizing is with the font since you will want to be able to control fonts in most of your projects. Scroll down to the line of code that reads
defaults   {
	font-family:               Times New Roman
}
If you prefer to write in Helvetica, for example, simply replace “Times New Roman” with “Helvetica.” That’s it; you’ve customized a style sheet.
Working with Headings
If all you want to do for this style is change the font, you could stop here, and the new style will be instantly available for export. If you want to rename your style sheet for easier reference, you can right-click on the new copy and rename it there (“Papers-Helvetica,” for instance).
In order to match MLA style, however, we need to make some additional changes. So, let’s dig a little deeper and perform a basic customization of the headers in Papers.
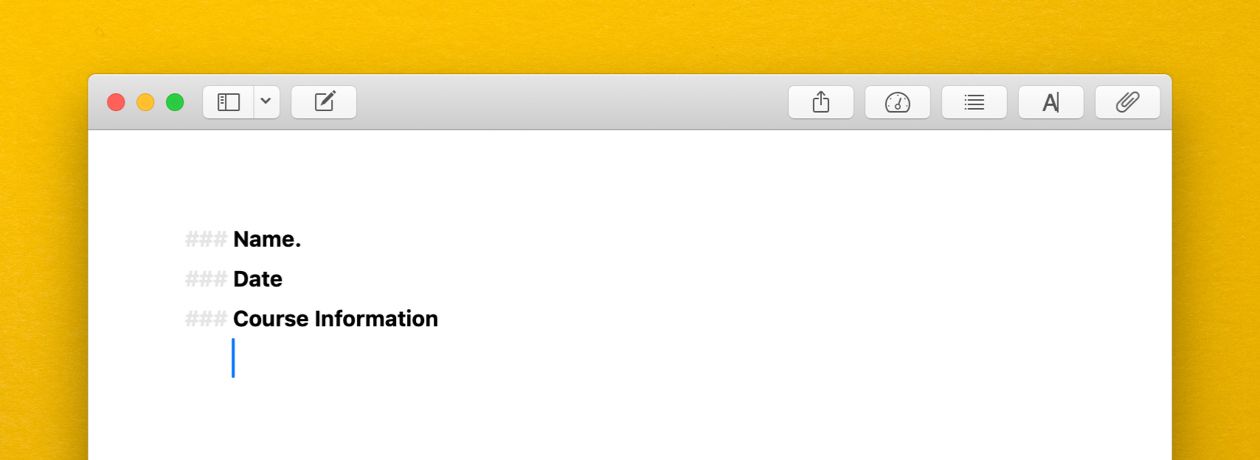
Headings really are the core of the style sheet. They are the style element you control when you use a hashtag or a series of hashtags (#, ##, ###, …). You’ve probably already used them to change font sizes in your titles and subheadings, but they take on a new life inside style sheets.
Scroll down a bit further inside the style sheet to the long section under // Headers. You’ll see code blocks for each individual heading. This is the code that interprets your inline hashtags. By setting page-alignment, font type and size, and indention, they can be used to manage essentially any kind of formatting element, from the title of your paper to character names in a screenplay.
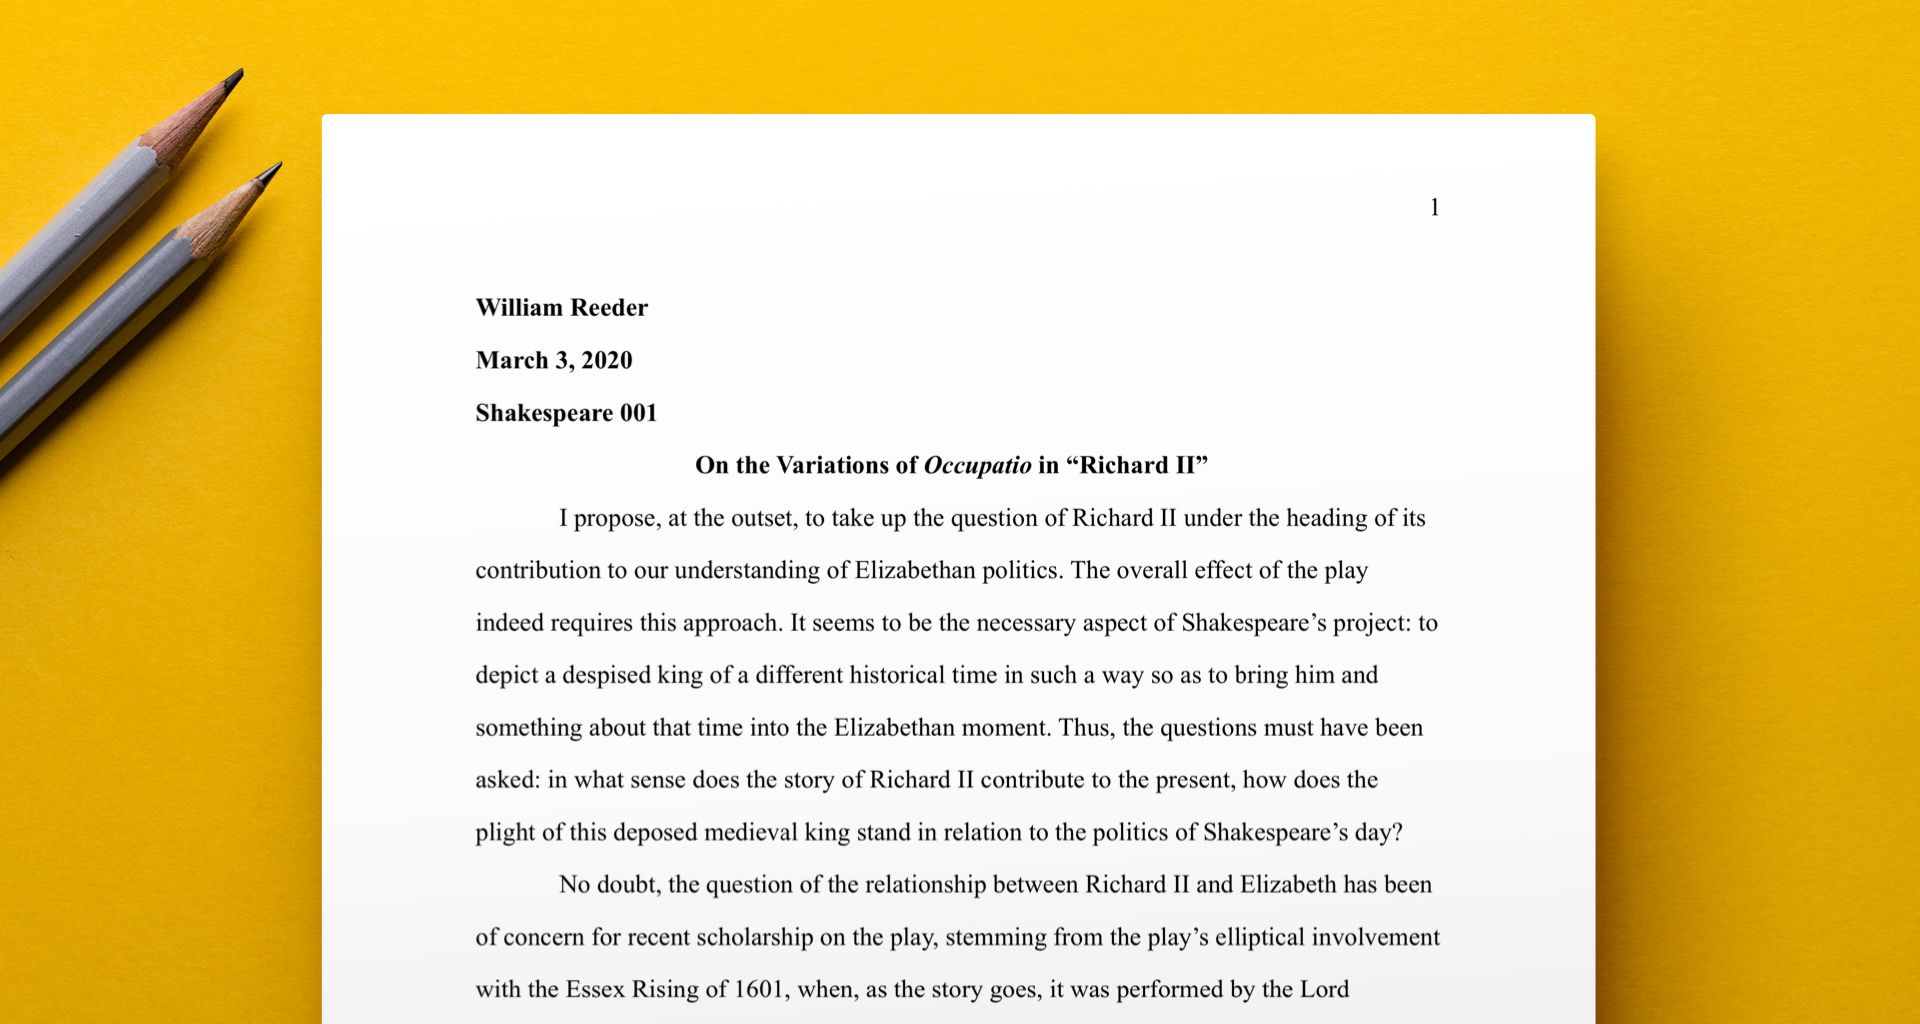
Here, we’ll use them to title your paper and to add the header with your name, date, and course information that goes in the top left corner of your title page, per MLA recommendations, of course.
Since we don’t usually bold titles in MLA format, I’ve changed the weight of Header 1 to normal:
heading-1 {
    style-title:            “Heading 1”
    text-alignment:         center
    font-weight:            bold
}
becomes:
heading-1 {
    style-title:            “Heading 1”
    text-alignment:         center
    font-weight:            normal
}
Now the settings for Heading 1 (a single #) are in line with standard MLA format for a title. Don’t worry; you can still add italics as necessary using the inline command *.
I also changed the font-weight to normal for Heading 3, which already has a text-alignment value of left. With these two settings in place, Heading 3 can now be used for the header of your paper. Using a separate heading for each line, your Ulysses sheet should look like this:
Block Quotes
MLA standards require that quotes of more than four lines long should be in “block quotes”. That means that the entire quote will be indented a 1/2 inch inside the main body text to indicate clearly that the quote is not part of your own work.
In the Papers style, the text in a block quote is set with italics, which we need to change because MLA standards require block quotes in the same font as the main body text. So, again,
Block-quote {
	style-title: block quote
	margin-left: indent
	font-slant: italics
}
becomes:
Block-quote {
	style-title: block quote
	margin-left: indent
	font-slant: normal
}
The inline command for a block quote is the >, and these characters can be stacked, much like using the “tab” key on a typewriter, to create multiple indentations. Additionally, if you are quoting poetry and need to take manual control of whitespace to present the original spacing, you can use non-breaking whitespace with ⌥⇧Space (option-shift-space). This will allow you to add extra whitespace that the style sheet will preserve in the final export.
That covers the basics of formatting an MLA paper using Ulysses style sheets. You can download the version of Papers I made for this article from the Ulysses style sheet library. If customizing a style sheet seems like a long process, remember that once you have a custom style sheet in your library, it will work for more than one project, and you’ll be able to manage style elements effortlessly as you type using the familiar inline commands.
(The procedure for customizing a style sheet, along with a more detailed look at style sheet code, can be found here.)